Nendra Banana Halwa

banana halwa.jpg

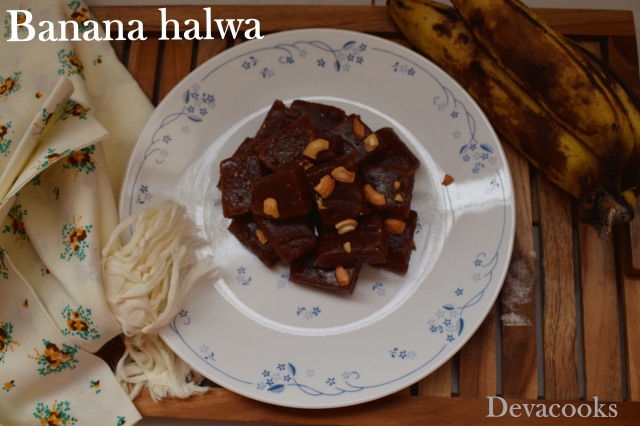
Banana halwa is a sweet which can be seen at majority of the houses in my native, i.e. undivided Dakshina Kannada district. At Udupi and Dakshina Kannada districts apartment culture is not common and majority of the people own a piece of land where they live and cultivate banana, coconut, arecanut, pepper and vegetables. When banana goes unattended by members of family or when yield is more, women at home turn them out as chips, halwa, buns, sweet dumplings and many more.

During my recent trip to Madhur temple which comes in Kerala State, I got some NENDRA banana to carry them to Hyderabad.

When in Hyderabad I miss some traditional food due to non availability of ingredients. Nendra banana halwa is one such sweet which I was eagerly waiting to prepare in my kitchen.

Ingredients used for making this addictive sweet is easily available at every Indian household. The only difficulty is time needed to make it and we have to be near flame till the halwa is ready.

If you do not get nendra banana,  replace it with Kadali variety.

Preparation time                    5 minutes

Cooking time                            1 hour more or less

Ingredients

Over ripened Nendra/nendran banaa                  3

Sugar                                                                              2/3 cup or more

Ghee                                                                               ½ cup

Cardamom powder                                                    1 tsp

Cashew nuts                                                                 as required


Method

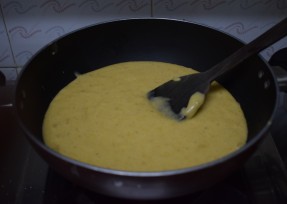
  • In a blender add chopped banana along with sugar to make a smooth paste. You can even mash them using potato masher or with the help of fork. Increase or decrease amount of sugar depending upon sweetness of banana.
  • DSC_0002.JPG DSC_0004.JPG
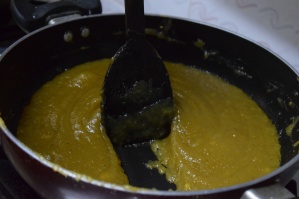
  • Transfer the ground mixture to a heavy bottomed pan along with 2 tablespoon of ghee and start stirring. Make sure you do not catch any work while preparing this halwa to avoid burning.
  • DSC_0006.JPG DSC_0009.JPG
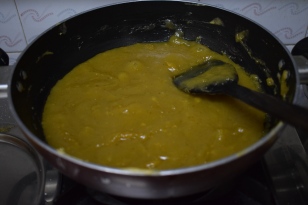
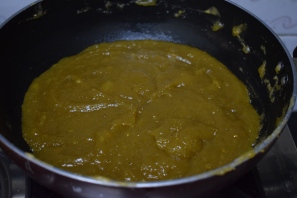
  • After sometime the colour of halwa will change to light brown from dark yellow. Start adding a tablespoon of ghee and keep stirring making sure the halwa is not getting stuck at bottom of the pan.
  • DSC_0010.JPG DSC_0011.JPG
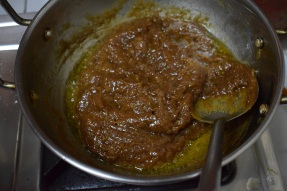
  • After some 20 min or so, the color of halwa will turn into dark brown and ghee will start to ooze out from halwa. Keep stirring till the mixture become thick and forms shape of ball. Once halwa is thick enough, immediately transfer them to a greased plate. Over cooking will turn halwa very hard and you will not be able to cut them.
  • DSC_0015.JPG DSC_0017.JPG
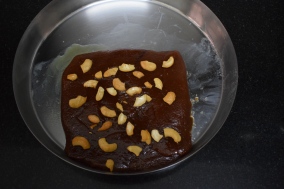
  • Using a greased spatula spread the halwa evenly and top them with fried cashew (optional).
  • Once halwa is cool, using a sharp greased knife cut them into squares and serve. Store them in airtight container.

Note

  • Avoid using non stick pan to get right consistency and dark brown color halwa. In pic you can see non stick pan in use 😉 but at later stage, I shifted them to regular thick bottom pan.
  • Over cooking will lead very hard halwa so keep an eye once they become thick.
  • If you want soft halwa, you can stop cooking when the mixture becomes thick. In that case you cannot serve them in slices.


Hurikadle Chakkuli

murukku final.JPG

Hurikadle/ putani kadle/ Fried gram chakkuli/murukku-  easy snack made using fried gram and rice flour along with some minimal ingredients are instant and easy.

Fried gram popularly known as hurikadle/ putani kadle in Kannada is used in many ways, be it in chutneys, kurma or even laddu. They never fail to impress with their unique taste. Though I do not include them in chutneys, I frequently make laddu and use them in curries to replace cashew nuts.

Fried gram is one such ingredient which can be found in almost all south Indian households so when you want to prepare any snack, these grams come handy.

During Deepavali/ Diwali, when I was pondering over ideas to make snack which are easy and consumes less time, fried gram came handy. This snack can be made in a jiffy and one do not have to master the art of cooking to make these murukku.

Preparation time                                10 minutes

Cooking time                                       15 minutes

Ingredients

  • Rice flour                                                      1 cup
  • Fried gram                                                    1/4 cup
  • Red chilly powder                                      1 tsp or more
  • Ajwain/ carom seeds                                 1/2 tsp
  • Salt                                                                 to taste
  • Hot oil                                                            1 tbsp
  • Oil to deep fry


Method

  • Make fine powder of fried gram and sieve them.
  • In a wide mixing bowl take one cup of rice flour, red chilly powder, salt to taste, ajwain and powdered fried gram.
  • 1 m.JPG
  • Heat a table spoon of oil, add to the above mix and mix everything well. When you add hot oil, you should find bubbles over flour.
  • 2m.JPG
  • Now start adding water little at a time and make a smooth and pliable dough.
  • 3m.JPG
  • Keep the dough covered in wet cloth for about 5 to 10 minutes.
  • After 10 minutes, heat oil in a kadai/ pan. For avoiding oil spilling to hands and avoid steam hitting face, I pressed murukku in murukku maker on to a greased spatula and gently dropped them to medium hot oil.
  • Fill chakkuli maker with good amount of dough and press them on greased spatula and gently drop them to medium hot oil.
  • 5m.JPG
  • Carefully flip chakkuli after one minute and fry both the sides till they turn slightly golden and bubbles reduce in oil.
  • 6m7m
  • Transfer them to plate or bowl lined with tissue paper to extract excess oil.
  • Repeat the process and allow them to cool in room temperature.

Note

  • Keep flame in between low to medium to avoid burning.
  • Too much of hot oil to dough will end up in soggy chakkuli so add only 1 tbsp.
  • You can replace ajwain with black sesame seeds in case you do not have them in kitchen pantry. 
  • You can even shape them to regular murukku using murukku disk.